Intro
In 2016, Garrett Grolemond gave a talk at the very first Shiny Developer Conference in Palo Alto, California. The first slide in his presentation read in big bold letters, “Writing Big Apps, How to use Shiny Modules”. You can find the slides here and a video of the talk here.
In a nutshell, shiny modules allow users to write composable shiny code. Little bite size pieces of code that can be reused and brought together to work as a whole. The idea is exciting because self contained chunks of shiny code are easier to manage when apps become large and complex.
Why not write functions?
I mean R is a functional programming language, just make functions! Well, the problem stems from the fact that shiny input and output IDs all share a global namespace. As a consequence, these IDs must be unique when creating functions that produce inputs and outputs otherwise, the IDs collide. This problem of providing spaces for names logically and without collision is solved by shiny modules. In other words, shiny modules adds namespacing to shiny! This is why functions aren’t enough. See Joe Cheng’s post here as he eloquently explains the namespace problem with shiny. For even more detail on namespaces, see Hadley Wickham’s namespace chapter in his R packages book here.
Oh and by the way, this is why you see tidyverse conflicts when loading the package, because certain tidy packages are overriding other packages. The tidyverse is stealing names so to speak and it’s letting you know.
library(tidyverse)
#> ── Attaching packages ────────────────────────────────────────────────────────────── tidyverse 1.2.1 ──
#> ✔ ggplot2 3.1.0     ✔ purrr   0.2.5
#> ✔ tibble  2.0.1     ✔ dplyr   0.7.8
#> ✔ tidyr   0.8.2     ✔ stringr 1.3.1
#> ✔ readr   1.1.1     ✔ forcats 0.3.0
#> ── Conflicts ───────────────────────────────────────────────────────────────── tidyverse_conflicts() ──
#> ✖ dplyr::filter() masks stats::filter()
#> ✖ dplyr::lag()    masks stats::lag()
Demonstration
To show off shiny modules, I thought it might be interesting to rewrite a shiny app I made in the past. This way, we can compare the two. The app I’m rewritting can be found here, it’s just a simple app I made to play with the brewr package I wrote. A demo to the app can be found here.
Packages
The following packages are used:
library(shiny)    # app framework
library(ggplot2)  # plotting
library(ggsci)    # color scales
library(forcats)  # reordering factors
library(jsonlite) # easy json to dataframe
library(brewr)    # homebrew json api wrapper
library(readr)    # convert datatypes easily
library(curl)     # need so shiny wont complain
library(glue)     # better paste0
library(cli)      # console tools
library(crayon)   # console colors
Can’t remember why shiny complained without the curl package? I probably did something wrong but oh well, moving on.
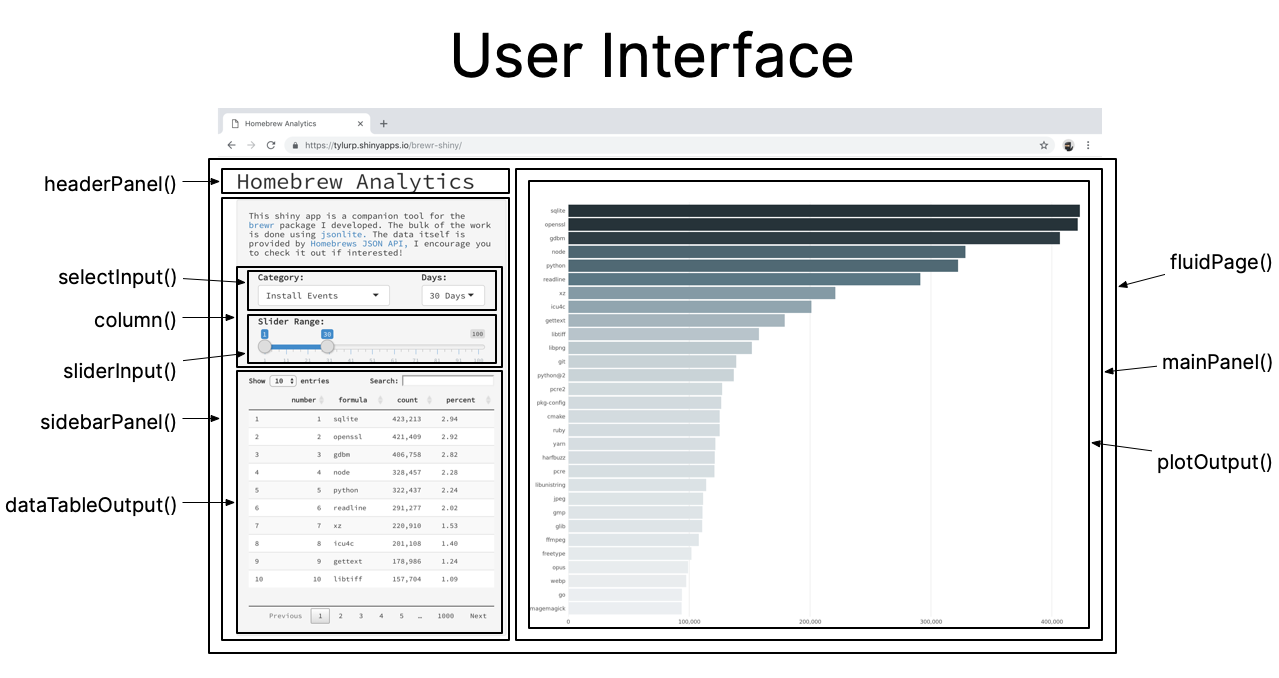
User interface
The interface is pretty simple. We have a left panel with some selectInputs, a sliderInput, and a dataTableOutput. On the right, we have a mainPanel which renders the graphic. This graphic will change depending on the options the user configures. These options include:
- Category
- Days
- Slider Range
Creating a shiny module
Currently, this app is bundled into a single app.R file, it talks to a few other other files like styles.css but for the most part it’s all in app.R. Consider the following selectInput:
column(
  width = 8,
  selectInput(
    inputId = "category",
    label   = "Category:",
    choices = c(
      "Install Events"            = "/analytics/install",
      "Install On Request Events" = "/analytics/install-on-request",
      "Build Error Events"        = "/analytics/build-error",
      "macOS Versions for Events" = "/analytics/os-version"
      ),
    width = 215
  )
)
We can put this in a module by defining the UI and Server logic, similar to a normal shiny app:
# Module UI function
ui_SelectEvent <- function(id, label = "Event:") {

  # Create a namespace function using the provided id
  ns <- NS(id)

  tagList(
    selectInput(
      inputId = ns("event"),
      label   = "Event:",
      width   = 215,
      choices = c(
        "Install Events"            = "/analytics/install",
        "Install On Request Events" = "/analytics/install-on-request",
        "Build Error Events"        = "/analytics/build-error",
        "macOS Versions for Events" = "/analytics/os-version")
    )
  )
}

# Modules Server function
srv_SelectEvent <- function(input, output, session) {
  selectedEvent <- reactive({
    input$event
  })
}
So there a couple of things to unpack here and I’m gonna do my best to go through them one by one.
- Naming convension: You’ll notice I’ve named the functions with a prefix (
ui_,srv_), this is to help me recognize which functions belong where. Joe Cheng offers a different approach which you should probably follow1. - The first argument is
idand this is required because it serves as the namespace for the module. - Building off of point 2, the contents of the function starts with
ns <- NS(id). It’s my understanding that this is also required, it takes the stringidin order to create a namespace function. - The
inputIdis wrapped in anns()call. Any inputs or outputs must be wrapped aroundns(). - The
selectInputis wrapped in atagList()call. In this example, I don’t think it’s actually needed because we aren’t passing along multiple UI components, just a single dropdown menu. - The server function has 3 arguments and they’re all required. Additionally, you can create additional arguments like
stringsAsFactorsfor example. - The input, output, and session arguments are special in that they can only access names that match up with the UI.
input$eventis referring tons("event").- Because of point 7, the inputs, outputs, and session arguments cannot be used to access inputs and outputs outside of its namespace. This is by design to prevent users from writing modules that implicitly interact with the app. The goal is to make interactions explicit.
Again, I’m more or less rehashing what’s already been written by Joe Cheng so I encourage you to take a look if you’re lost.
Using the module
Consider that the chunk of code above is saved in a folder called “modules”. We can make that module accessible to app.R by sourcing it with the source function. In one example, consider that I have created two folders: functions and modules. I can source all my functions and modules by placing these lines of code after loading all the necessary packages:
# list all module files
modules <- list.files('modules', full.names = TRUE)

# list all function files
functions <- list.files('functions', full.names = TRUE)

# create an object that has both modules and functions
imports <- c(modules, functions)

# loop through them all and run the source function
sapply(imports, source)
At the end a simple shiny app with a single sliderInput would like this:
library(shiny)

modules <- list.files('modules', full.names = TRUE)
functions <- list.files('functions', full.names = TRUE)
imports <- c(modules, functions)
sapply(imports, source)

ui <- fluidPage(
  ui_SelectEvent("event")
)

server <- function(input, output, session) {
  event <- callModule(srv_SelectEvent, "event")
}

# Run the application
shinyApp(ui, server)
However, another option would be to use a global.R file which is my preferred method of loading libraries and sourcing functions/modules in a shiny app. The global.R file is ran before the shiny app and so you can have a “start up” script that contains everything necessary to make the app start. Keep in mind that this requires the app be split into ui.R and server.R.
In my final modularized shiny app, global.R looks like this:
library(shiny)    # app framework
library(ggplot2)  # plotting
library(ggsci)    # color scales
library(forcats)  # reordering factors
library(jsonlite) # easy json to dataframe
library(brewr)    # homebrew json api wrapper
library(readr)    # convert datatypes easily
library(curl)     # need so shiny wont complain
library(glue)     # better paste0
library(cli)      # console tools
library(crayon)   # console colors

modules <- list.files('modules', full.names = TRUE)
functions <- list.files('functions', full.names = TRUE)
imports <- c(modules, functions)
sapply(imports, source)
The structure of my project looks like this 2:
#> brewr-shiny-modules
#> ├─brewr-shiny-modules.Rproj
#> ├─ui.R
#> ├─server.R
#> ├─global.R
#> ├─functions
#> │ ├─brewr_plot.R
#> │ └─transform_data.R
#> └─modules
#>   ├─selectDays.R
#>   ├─selectEvent.R
#>   └─sliderRange.R
You can find the source code here.
Careful Design
If used carefully, shiny modules are a great way to organize, manage, and debug your application. If used without care, shiny modules can seem like more work than is necessary. This isn’t a critique on shiny modules, it’s more so an idea that rings true to most programming projects in general. Without thoughtful decisions about the modules design, we invite unnecessary problems to the application. One problem might be implicit interactions between modules that makes the application difficult to decipher.
Conclusion
If you’re developing a large shiny application, consider implementing shiny modules to save yourself from giant, unreadable scripts. The benefits are plenty worth it and if designed thoughfully, will save yourself time in the future by reusing modules for other parts of the app or for future projects.